Table of Contents
Universal App Development
Sparrow's Scaffold project is preconfigured as a universal app, i.e. it runs on all iOS devices. In fact, that's the top feature of the scaffold project: to minimize the effort of creating a game that runs on all iOS devices.
Before you start with your game, it's important to understand how this task is achieved. It's a simple process in the end, but it's a little hard to explain, so let me take you by the hand.
And here is another compilation containing all the required “Default.png” variants, icons, etc: List of properties of iOS media files
The Challenge: Different Screen Sizes
First of all: forget about retina displays for now. Just think of the first iPhone and iPad. We'll add the retina-complexity later.
The problem with universal apps is that the display resolutions between iPhone and iPad differ that much. The following image shows you how much:
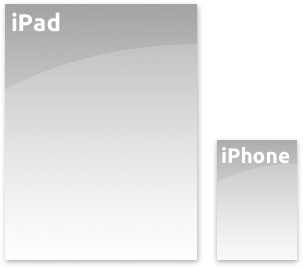
The iPhone screen is just a fraction of the iPad screen – less than one fourth of the size/pixels!
For that reason, Apple recommends to create special user interfaces for the iPad. In conventional apps, that makes sense: just think of the Mail app. If Apple had simply scaled up the version running on the iPhone for the iPad, this would not have made much sense: we want to make use of the additional space!
Many games, however, are different. A game like “Doodle Jump” or “Cut the Rope” can be scaled to the full screen, and still look and feel great. This is why we'll use that approach here.
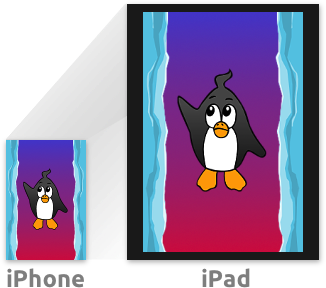
Step 1: Scaling Up
Let's say our initial game was designed for the iPhone (320×480). Now we simply scale it up by two. Why two? Because that scale factor does not generate any rounding problems – one pixel becomes exactly 4 pixels (2×2).
But how do we do that? As you know, all Sparrow content is rendered into an UIView. So this it what we scale up: we'll make the UIView have a size of 640×960 pixels.
Now here's the critical thing to understand: scaling up the UIView object does not change the stage size! The stage size describes just the coordinate system you are developing for, and it is always stretched up to fill the complete UIView. In fact, that's where the difference between “Pixel” and “Point” comes from!
The Scaffold project already does that for you, of course. Here is the result of our efforts:

Now the size difference is not so bad, after all! Two issues remain, however:
- The graphics look blurry on the iPad, because we've simply scaled up our textures.
- We've got unused space at the right and bottom.
Let's tackle them one after the other.
Step 2: Adding HD textures
The first issue is easy to solve. Remember that Retina stuff I told you to ignore? Now is the time to add that to the equation.
By adding graphics with the @2x suffix, the game will automatically use HD textures when it's executed on the iPhone 4.
That should work just the same on the iPad, right? Well, bummer. When you start it up on the iPad, your game is still using the low resolution textures. Why is that? Because the iPad does not have a Retina display. Remember, the @2x suffix is used on Retina displays only.
Sparrow to the rescue! We can tell it to let the iPad pretend it has a Retina screen by starting it with the following arguments:
[controller startWithRoot:[Game class] supportHighResolutions:YES doubleOnPad:YES];
Note the “doubleOnPad:” parameter; it will make the iPads 1+2 load HD textures, and the graphics are crisp and sharp again. W00t!

Let's summarize what he have done this far:
- We have created our game with a stage size of 320×480 points.
- On the iPad, we let Sparrow render that stage into a 640×960
SPView. - We added HD graphics for Retina iPhones.
Step 3: Filling the Gaps
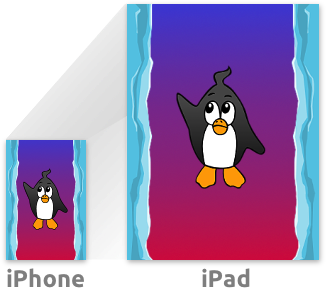
The image above shows that there is still one issue remaining: we've got two unused bars at the right and the bottom. What do we do with that?
Quick & Dirty Solution
The simple solution: center the game on the screen and add a black frame around the game. If you're satisfied with that, all you have to do is modify the file Game.m slightly. Add the following render method:
- (void)render:(SPRenderSupport *)support
{
    float stageHeight = Sparrow.stage.height;

    if (stageHeight == 512)
    {
        glEnable(GL_SCISSOR_TEST);

        float scale = Sparrow.contentScaleFactor;
        float x = 32 * scale;
        float y = 16 * scale;
        float width  = 320 * scale;
        float height = 480 * scale;

        glScissor(x, y, width, height);

        [super render:support];
        [support finishQuadBatch];

        glDisable(GL_SCISSOR_TEST);
    }
    else
    {
        [super render:support];
    }
}
Agreed, some might call this a “hack”. 
However, it's still much better than distributing the game as iPhone-only and give people the “2x” scale button. So let's just call this the “pragmatic” solution. 
Sophisticated Solution
On the other hand, it would be nice if we could actually use the additional space. In many games, this is rather simple: we just have to align our user interface at the sides of the game area instead of hard-coding their positions in the 320×480 range.
In other words, we'll have to support two stage sizes:
- 320×480 for iPhone devices
- 384×512 for iPad devices. (Remember, we've scaled up the game by two, so we have to use half the iPad resolution!)
The scaffold project sets up your stage in the correct size already, depending on where it is started. All you have to do is align your objects depending on the size of the stage.
Device Modifiers
These guidelines make it possible to use the same assets for both the iPhone and the iPad most of the time. However, sometimes you still need to load different images, depending on the device your game is running on. This is where the so-called “device modifiers” come into play.
That's just an additional suffix that tells Sparrow for which device a certain image was designed for. Just add either “~iphone” or “~ipad” before the file extension (after the “@2x” modifier), like this:
image@2x~iphone.png
image@2x~ipad.png
Sparrow will automatically load the image that is best suited for your device.
Summary
I hope you're still with me! In case you're feeling a little overwhelmed, don't worry about it too much. Just remember the two resolutions you have to develop for: 320×480 and 384×512. Everything else will fall in place automatically.
But wait! What about more recent iOS devices?
Retina iPads
Supporting a Retina iPad is quite simple: in the setup described above, just add another set of textures, with the suffix @4x. (Remember, @2x is already taken.)
Now we've got quite a number of different texture sets. Here's a lineup of devices and the textures they are loading:
- iPhone, non-retina:
image.png - iPhone, retina:
image@2x.png - iPad, non-retina:
image@2x.png - iPad, retina:
image@4x.png
iPhone 5
The iPhone 5 has a different aspect ratio than other iPhone models, which means some additional work. It's not really difficult, though! Actually, the workflow is just the same as with a universal application.
- When the game is started, you either find a stage size of 320×480, then it's an old iPhone.
- Or you find a stage size of 320×568, then it's a new iPhone.
What you have to do now is design your interface in a way that it can cope with those different sizes. Some positions can't be hard-coded any longer, but need to be set in dependence of the screen size.
int stageHeight = Sparrow.stage.height;

// align "myObject" at the bottom.
myObject.y = stageHeight - myObject.height;
This should be all of the information you need to optimize your game for all kinds of iOS devices. Good luck!
Continue to Adding UIKit Elements