Table of Contents
PVR Textures
While PNG textures get the job done most of the time, they can be greedy when it comes to memory consumption. When your graphics memory is beginning to fill up, PVR textures might come to the rescue!
PVR textures come in different flavors, some of them reducing the image quality of your textures. The following comparison shows the results of using the format to both file size and image quality.

Lossy compression: PVRTC
The TC in “PVRTC” stands for “texture compression”. The format uses a lossy compression to reduce the file size, which means that image quality will be affected.
That's different to the compression used in PNG textures, which is “lossless”, meaning that it saves space without actually changing any pixels. Another immensely popular “lossy” file format is JPG. I'm sure you have seen overly compressed JPG images with heavy artifacts. The same can happen with PVRTC compression.
PVRTC textures can be created with a command line tool called texturetool that's part of the iOS SDK.
/Applications/Xcode.app/Contents/Developer/Platforms/
iPhoneOS.platform/Developer/usr/bin
To access that tool without typing in the full path, you can add that longish path to your PATH environment variable.
Here is a sample call of that tool:
texturetool -m -e PVRTC -f PVR -p preview.png -o texture.pvr texture.png

# parameters:
# -m             -> create mipmaps for better image quality
# -e PVRTC       -> use PVRTC compression
# -f PVR         -> write PVR file header (don't leave that out!)
# -p preview.png -> create a PNG file showing how the result will look like (optional)
# -o texture.pvr -> write the PVR file into this file
# texture.png    -> input file
You can tweak the compression quality with these additional arguments:
--bits-per-pixel-2   # lower quality, smaller output
--bits-per-pixel-4   # higher quality, bigger output (default)
While PVRTC can reduce the memory footprint immensely, the image quality can suffer — well, equally so.
The result, however, depends on the image you're compressing. In a nutshell, organic images like photos compress well, while line-drawings can become downright ugly.
The two images on the right in the sample above are proof: you can save a lot of memory with PVRTC. The 4 bit version takes up only about 13% of the original file, while the image quality is still acceptable. The 2 bit version gets down to 6%, but at the cost of a radically deformed output.
Uncompressed PVR
The second variant of PVR textures is uncompressed. Nevertheless, you can still use them to save memory.
That's because PVR textures allow several different bitrates. If you've got an image with only a few colors, you don't need the full 24bit RGBA color space; a few bits per pixel might be enough. If you play around with different settings, you might find one that works well enough for your texture.
Unfortunately, “texturetool” is not able to create those texture formats. You need a different tool for that: “PVRTexTool”. Get it directly from the PowerVR Website. (Note: you have to create a user account on that page, but it's free.)
After downloading and uncompressing the archive, the folders that are interesting for us are “PVRTexToolCL” and “PVRTexToolGUI”. One of them contains a command line interface (great to automate the process), the other a graphical user interface.
We'll have a look at the GUI here to get you started. Be warned: “PVRTexTool” is not pretty! But it gets the job done. 
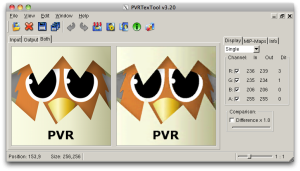
Here you can see it in action, with an image already opened up and compression applied. But one step after the other.
- Click on 'File - Open' to choose your texture. (Remember: POT and square!)
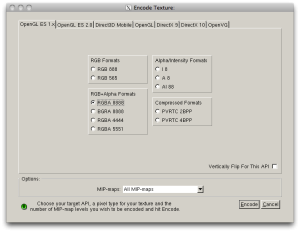
- Click on 'Edit - Encode Texture' to choose the compression settings. Stay in the first tab (OpenGL ES 1.x).
- After checking the result, click on 'File - Save as' to save the texture in PVR format.
Note that there are formats with and without an alpha channel, the compressed formats we've already talked about, and an intensity-only format. Sparrow can read all those formats.
The naming scheme works like this:
- “RGB 888” → per pixel: RGB, 8 bits per channel, no alpha
- “RGB 565” → per pixel: 5 bits of red, 6 bits of green, 5 bits of blue, no alpha
- “RGBA 5551” → per pixel: RGB with 5 bits per color, 1 alpha bit (either transparent or not)
- etc.
When you save the texture, be sure that the checkbox “Vertically Flip for this API” is deactivated, otherwise your textures will appear upside down in Sparrow.
Another nice thing about this tool is that you can manually define if mipmaps should be created and saved with the texture. If your images won't be scaled down in Sparrow, you can safely skip them and save a little extra memory.
- Click on 'File - Save as Legacy' when you are exporting the file.
- If you are using the command line tool, add the switch
-pvrlegacy.
That's it about PVRTexTool! I wanted to show it to you since it gives you a lot of control over your textures, which helps understanding what is happening under the hood.
If you have another look at the image at the start of this tutorial, you see that you can still save quite a lot of memory if you reduce the image's color palette. If you've got textures that are rather flat (i.e. without many gradients), this will be a good alternative to PVRTC.
Gzip-Compressed PVR
There's one more flavor of PVR textures I have not mentioned before — but, actually, it has nothing to do with PVR itself. I'm talking about Gzip-compressed PVR textures.
The problem with the uncompressed format I just talked about is that it tends to produce really huge files. To compensate that, Sparrow accepts PVR files that are compressed with the Gzip algorithm.
To be clear about this, that compression won't save any graphics memory. Just as PNG textures, Gzip-compressed files have to be decompressed before moving them into graphics memory. You won't even save your users much download time, because Apple compresses your app anyway before sending it to the users. But you'll save the users of your app disk space.
When you've got a game with many textures, this can make a huge difference (dozens of MB vs. hundreds of MB). And since it does not have downsides in terms of speed or memory consumption, I recommend to always gzip your PVR files. (Don't do it for PVRTC-files, though. It's supported, but does not make much sense.)
It's very easy to compress a file via the terminal. This makes it ideal for shell-script integration.
gzip texture.pvr        # -> texture.pvr.gz
gunzip texture.pvr.gz   # -> texture.pvr
Conclusion
That should be all you need to know about the PVR texture format! The next time you're running out of texture memory, be sure to come back and put your new knowledge into practice.
Andreas Löw supports us by sharing some of his revenue with us when Sparrow users purchase one of his tools. If you choose to buy Texture Packer, it would be great if you could use the following link: Purchase TexturePacker – thanks in advance!
Next Section: Flattened Sprites

