Table of Contents
Adding UIKit Elements on top of Sparrow
The following article assumes that your game is based on the Scaffold project that comes with Sparrow 1.3.
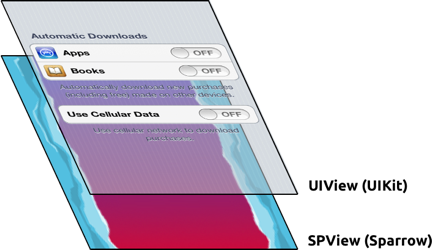
The scaffold project contains an additional UIView object directly above Sparrow's SPView. Just like your Sparrow content, that view is automatically rotated according to the device orientation and your app settings. It is thus the perfect place to put any UIKit content.
In this tutorial, we will add a simple UISwitch object to the overlay view. Changing the state of the switch will then affect the color of an object within the Sparrow display tree.
While the sample itself does not look super-useful, it will show everything you need to know to be able to combine UIKit and Sparrow elements in interesting ways.
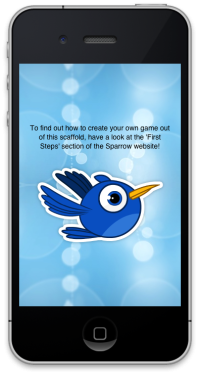
This is how the app looks like in its unmodified state:
Adding the Switch
The world of Sparrow and the world of UIKit are separated. As the image at the top of this article shows, their content is placed within 2 different layers:
- a
UIViewobject for UIKit objects and - an
SPViewobject for Sparrow content.
The ViewController class that is part of the scaffold project can access both of those worlds.
Currently, when you touch the egg, a sound is played. Let's say we want to show the UIKit switch instead. To do this, we update the event handler and dispatch a custom event instead:
- (void)onEggTouched:(SPTouchEvent *)event
{
    NSSet *touches = [event touchesWithTarget:self andPhase:SPTouchPhaseEnded];
    if ([touches anyObject])
    {
        SPEvent *event = [SPEvent eventWithType:@"eggTouched" bubbles:YES];
        [self dispatchEvent:event];

    }
}
Why do we dispatch an event here? Because this is the only way we can communicate with the ViewController class. Remember: we're on the Sparrow layer here!
The ViewController can now listen to this event. Open up ViewController.m and add an appropriate event listener in its init-method:
- (id)initWithSparrowView:(SPView *)sparrowView
{
    if ((self = [super init]))
    {
        // ...

        [sparrowView.stage addEventListener:@selector(showSwitch:) atObject:self
                                    forType:@"eggTouched"];
    }
    return self;
}
Note that the stage is a property of the Sparrow view, and that's our connection to the Sparrow world. The event we dispatched above will bubble up to the stage, thus we can listen to the event through the stage.
We're going to need an event listener, of course. Add the following methods to the ViewController class:
- (void)showSwitch:(SPEvent *)event
{
    if (!mSwitch)
    {
        mSwitch = [[UISwitch alloc] initWithFrame:CGRectMake(15, 15, 0, 0)];
        [mSwitch addTarget:self action:@selector(onSwitchValueChanged)
          forControlEvents:UIControlEventValueChanged];

        [self.view addSubview:mSwitch];
        [mSwitch release];
    }
}

- (void)onSwitchValueChanged
{
    NSLog(@"value: %d", mSwitch.isOn);
}
Here, we create a switch and display it at the top left of the screen. Furthermore, we log a message every time the switch changes its value.
That mSwitch object needs to be declared, of course. Add its declaration to the ViewController.h file.
@interface ViewController : UIViewController
{
  @private
    SPView *mSparrowView;
    UISwitch *mSwitch; // <-- here
}
And add the function declaration to the same file:
- (id)initWithSparrowView:(SPView *)sparrowView;
- (void)showSwitch:(SPEvent *)event;    // <--- here
Let's start up the project and see what happens. After tapping the egg, the switch should appear, and Xcode should log 1s and 0s when its state changes.

Communicating with our Game
The previous step showed us how to send a message from Sparrow to the ViewController. Now we want to go the other direction: the ViewController should somehow communicate with our Game class and change the color of the egg.
First, we will update the method that is called when the switch changes its value:
- (void)onSwitchValueChanged
{
    Game *game = (Game *)[mSparrowView.stage childAtIndex:0];
    [game colorizeEgg:mSwitch.isOn];
}
Let's see what is going on here:
- We know that our stage is really the
GameControllerclass, and that theGameControllerhas exactly one child: theGame. So we can access it like shown above. (If that confuses you: it's like that simply because the scaffold project is set up like that. Just trust me: the line above let's you access theGame, period.) - Now that we can access the game, we can call any method on it. Here, we colorize it.
The colorizeEgg: method does not exist yet, though. Let's create it!
// add a new method declaration in the file 'Game.h':
- (void)colorizeEgg:(BOOL)colorize;

// then add the method in the class implementation, 'Game.m':
- (void)colorizeEgg:(BOOL)colorize
{
    SPImage *egg = (SPImage *)[self childAtIndex:1];
    egg.color = colorize ? SP_RED : SP_WHITE;
}
(It would have been cleaner to save the egg object as a member variable instead of accessing the child at index '1', but I'll leave that as an exercise for you  ).
).
That should be it! Indeed, we have succeeded in communicating up from the ViewController class to the Game. If you don't believe me, start up the project, tap the egg, and then activate the switch!

Cool, isn't it? Now you can add any other UIKit element just like that.