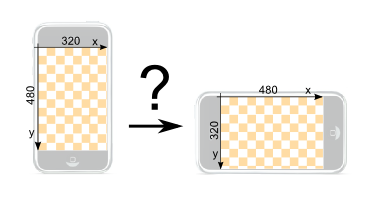
Using Landscape Mode
Update: If you are using the Scaffold project of Sparrow 1.3 or 2.x, the process described below is already prepared for you. Find out all about it here.
When you create a new game in Sparrow, it uses portrait mode by default. Theoretically, you could rotate the Cocoa view object that Sparrow renders into — but that's not recommended, as it slows down rendering a bit (for very simple games, you can safely try it, though).
So, how best to use landscape mode in Sparrow?
The answer is simple: instead of rotating the Cocoa view, rotate the root of your Sparrow display tree. Just add one Sprite to your game's main class (the one that is a subclass of SPStage), and rotate it by 90 degrees (see below). Now, just add all other content to that Sprite instead of the stage.
// Create the sprite mContents and add all your display objects to it instead of
// adding it to the stage. It is rotated for landscape display.
mContents = [[SPSprite alloc] init];
mContents.rotation = SP_D2R(90);
mContents.x = 320;
[self addChild:mContents]; // 'self' is your stage
But why and how does this work?
Imagine a big pin board, hanging on the wall in portrait mode, just like the default iPhone orientation. Let's say that pin board is 320mm wide and 480mm high. It represents your iPhone screen, or, in Sparrow-speak: the stage. If you draw a coordinate system on that board, the origin will be at the top left position, the x-axis points right, the y-axis down. So far, no problem.
Now, take a piece of paper that has the same size as the pin board, and lay it down before you in landscape (!) mode. Draw the origin at the top left, and the axes (the x-axis going right for 480mm, the y-axis going down for 320mm). That paper represents the coordinate system we want: one that is in landscape mode.
When you add that sprite to the stage, it will be added at the point (0|0). In our analogy, pierce the pin first through the origin of the sheet of paper, and then through the origin of the pin board. Step back and have a look at pin board and paper, as shown in step 1.
- The two coordinate systems are the same: x- and y-axis of pin board and paper lie exactly over each other.
- However, the paper exceeds the pin board at the right, and fills it only for about two thirds down.
What we have to do now is to move the sheet of paper around so that it takes exactly the space of the pin board. Then we would have the coordinate system we need: one that is in landscape mode and takes up our screen.
Look back at the (portrait mode) pin board and the (landscape mode) sheet of paper. It's easy to realign it: first we rotate it by 90 degrees about its origin (clockwise, step 2). That makes the x-axis point down, and the y-axis point left — just as we want it to (step 3). But now, the positive y-axis is outside of the pin board! To rectify that, we remove the pin, move the paper to the right (so that its origin is directly above the top right corner of the pin board), and re-anchor it with the pin (step 4).
In other words:
mContents.rotation = SP_D2R(90); // rotate paper by 90 degrees
mContents.x = 320; // move paper to the right
Now, our paper is attached just like we want it to: x-axis goes down, y-axis goes left, the origin is in the top right position. Voilà, that paper is in portrait mode!
Is there something else that has to be done?
One more thing is important: you have to tell iOS which orientation you are currently using.
That is done by updating your application.plist file. Add the key “Initial interface orientation” and choose the appropriate orientation.
To do the same in code, you can use the method “setStatusBarOrientation”. Set it like this:
[[UIApplication sharedApplication] setStatusBarOrientation:orientation];
Informing iOS about the orientation your are using has several important effects:
- Overlays like the volume info box will be displayed correctly.
- Touch events are shifted by a few pixels by UIKit (to a position that feels more natural). If you don't update the status bar, this might move your touches to awkward positions.
If you want to know how to update the interface orientation automatically, there is a tutorial on that topic, too.

