Table of Contents
Custom Display Objects
One nice thing about Sparrow is that you can modify almost any aspect of the actual rendering process. You can not only review the code to see how it uses OpenGL to render display objects; you can actually create custom display objects with their own render methods.
This section will show you how to create a subclass of “SPDisplayObject” that contains its own render method. This is an extremely powerful feature, but be warned: we're entering quite low-level OpenGL terrain here!
The Polygon Class
We'll learn how to do that by writing a simple “Polygon” class. That class should be able to render regular polygons with an arbitrary number of edges and with a custom color. Here's what the output will look like:
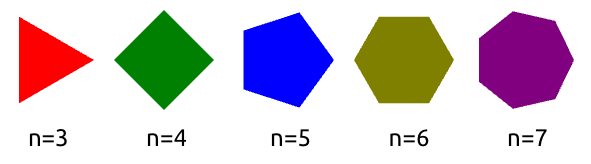
You should be able to use the class like shown below, i.e. just like any other display object.
Polygon *polygon = [[Polygon alloc] initWithRadius:50.0f numEdges:6 color:SP_COLOR_RED];
polygon.x = 60;
polygon.y = 60;
[self addChild:polygon];
Class Overview
Let's have a look at the basic scaffold of the polygon class. These are the minimal functions you have to implement:
@interface Polygon : SPDisplayObject

- (id)initWithRadius:(float)radius numEdges:(int)numEdges color:(uint)color;
- (void)dealloc;

- (SPRectangle*)boundsInSpace:(SPDisplayObject*)targetSpace;
- (void)render:(SPRenderSupport *)support;

@end
The first two methods initialize and destroy the object, respectively. I'm sure you are familiar with those.
The others are required to define the behavior of our polygon:
- boundsInSpace: calculates the boundaries of the polygon in a specific coordinate system. When you implement that method, you get a bunch of other methods for free (
width&heightproperties,hitTestmethod for touch processing). - render: draws the object on the screen.
Out of those methods, the “render:” method will arguably be the most sophisticated one. It will contain low-level render code, which Sparrow tried so hard to hide from you in the first place.
But that's why we're here, right? So bring it on!
Polygon class. At the end of this page, you will find the complete source code.
Vertex Data
When we're talking about OpenGL, we are talking about vertices and triangles. Everything that is rendered has to be built up from triangles, and each triangle is made up of three vertices.
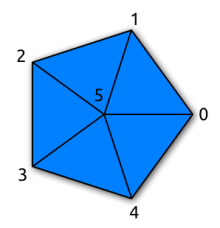
Our regular polygon can be built with a few triangles, too. Let's look at the pentagon on the right as an example.
It's made up of 6 vertices that span up five triangles. We gave each vertex a number between 0 and 5, with 5 being in the center.
Each vertex has a position and a color. (In our sample, the color will be the same for each vertex.) Since vertices are so important, Sparrow contains a very useful class that can be used to manage them: SPVertexData.
To set up the vertices of a regular polygon, we don't need any rocket science. Here's the code that will do it:
// member variable
SPVertexData *_vertexData;

// set up vertex data
_vertexData = [[SPVertexData alloc] init];
_vertexData.numVertices = _numEdges + 1;
_vertexData.color = _color;

[_vertexData setPositionWithX:0.0f y:0.0f atIndex:_numEdges]; // center vertex

for (int i=0; i<_numEdges; ++i)
{
    float angle = i*2*PI / _numEdges;
    SPPoint *edge = [[SPPoint alloc] initWithPolarLength:_radius angle:angle];
    [_vertexData setPosition:edge atIndex:i];
}
This code creates a vertex data object containing _numEdges+1 vertices, with a uniform color. The center vertex is at (0, 0), while the other vertices are on a circle around the center.
So much for the vertices. Now we need to define the triangles that make up the polygon. We do that by creating an array that contains one triangle after the other, referenced by three vertex indices per triangle.
In our Polygon sample, the vector would look like this:
5, 0, 1, 5, 1, 2, 5, 2, 3, 5, 3, 4, 5, 4, 0
Or in code:
// member variable
ushort *_indexData;

// set up index data
int numIndices = _numEdges * 3;

_indexData = malloc(sizeof(ushort) * numIndices);

for (int i=0; i<_numEdges; ++i)
{
    _indexData[i*3  ] = _numEdges;
    _indexData[i*3+1] = i;
    _indexData[i*3+2] = (i+1) % _numEdges;
}
Gosh, I think this is the first malloc call in the complete manual! But fear not: the code just creates a ushort-array that will hold all the index numbers. We just have to remember to free the memory later in the dealloc method:
- (void)dealloc
{
    free(_indexData);
}
This is all the information we need to render the object. Remember: it always works that way, no matter which object you want to draw. Split up the object into triangles made up of vertices. That's all there is to it!
Object Bounds
Now that we have all vertices together in that “SPVertexData” object, we've got all we need to create the bounding box of our polygon. This is what the “boundsInSpace:” method is for.
- (SPRectangle *)boundsInSpace:(SPDisplayObject *)targetSpace
{
    SPMatrix *matrix = [self transformationMatrixToSpace:targetSpace];
    return [_vertexData boundsAfterTransformation:matrix];
}
As you can see, there's fortunately not much to do here.
- In the first line, we create a transformation matrix. Such a matrix describes mathematically how the two coordinate systems (ours and that passed in) are related to each other. In other words: this matrix can be used to calculate where our vertices are relative to the target space.
- The actual calculation of the bounds is done by the vertex data object, so we just forward the data to its corresponding method.
The nice thing about this method is that we get a bunch of functionality for free, once it's implemented. The “width”, “height”, and “hitTest” methods use those bounds per default.
Vertex- and Index-Buffers
To be of any use for rendering, though, the data we created above (_vertexData and _indexData) needs to be uploaded to the GPU.
In OpenGL, this means we have to create VertexBuffer and IndexBuffer objects. Think of those objects just as if they were simple arrays. The only difference: they are not in conventional memory (like all the other Objective-C objects you're working with), but are saved directly in graphics memory.
// member variables

uint _vertexBufferName;
uint _indexBufferName;

// create buffers

int numVertices = _numEdges + 1;
int numIndices  = _numEdges * 3;

glGenBuffers(1, &_vertexBufferName);
glGenBuffers(1, &_indexBufferName);

if (!_vertexBufferName || !_indexBufferName)
    [NSException raise:SP_EXC_OPERATION_FAILED format:@"could not create vertex buffers"];

glBindBuffer(GL_ARRAY_BUFFER, _vertexBufferName);
glBufferData(GL_ARRAY_BUFFER, sizeof(SPVertex) * numVertices, _vertexData.vertices,
             GL_STATIC_DRAW);

glBindBuffer(GL_ELEMENT_ARRAY_BUFFER, _indexBufferName);
glBufferData(GL_ELEMENT_ARRAY_BUFFER, sizeof(ushort) * numIndices, _indexData,
             GL_STATIC_DRAW);
This actually looks far more intimidating that it really is. For both index- and vertex buffer, we execute three steps:
glGenBuffers()— create the bufferglBindBuffer()— activate the bufferglBufferData()— upload raw data to buffer
When that's done, the GPU knows the positions and colors of those vertices and triangles. But it doesn't know how to render them yet.
Rendering
The render method is what actually draws an object. It is executed once per frame for every display object, using OpenGL ES 2.0 to communicate with the GPU. It goes without saying that this method is critical when it comes to performance.
Beware: your hands may get a little dirty now, because we're digging down to GPU level!
Shader Programs
As we already learned above, the GPU needs anything to be composed of vertices that span up triangles. We already uploaded this data to the GPU in the form of a vertex- and an index-buffer.
To specify how those triangles will be rendered, developers need to write special programs that will be executed directly on the GPU: shaders. They come in two flavors:
- Vertex Shaders are executed once for each vertex. Their input is made up of the vertex properties we defined above; their output is the final color and position of the vertex in screen coordinates.
- Fragment Shaders are executed once for each pixel (fragment) of the object. Their input is made up of the interpolated properties of the three vertices of their triangle; the output is simply the color of the pixel.
- Together, a fragment and a vertex shader make up a Shader Program.
In other words, this means that this would normally be the point where we have to write such shaders. Indeed, some custom display objects will require you to write shaders.
SPBaseEffect
In this sample, we don't have to write any shader code, though. For conventional 2D rendering, we don't need a whole lot of complex logic in our shaders. That's why Sparrow comes with a simple helper class that will create the correct shader programs automatically.
// member variable
SPBaseEffect *_baseEffect;

// init-method
_baseEffect = [[SPBaseEffect alloc] init];
On rendering, we just need to configure that object with the correct settings, and we are good to go.
Render Method
- (void)render:(SPRenderSupport *)support
{
    // always call this method when you write custom rendering code!
    // it causes all previously batched quads/images to render.
    [support finishQuadBatch]; // (1)

    // make this call to keep the statistics display in sync.
    [support addDrawCalls:1];  // (2)

    // configure base effect (3)
    _baseEffect.mvpMatrix = support.mvpMatrix;
    _baseEffect.alpha = support.alpha;
    [_baseEffect prepareToDraw];

    // apply the current blendmode (4)
    [SPBlendMode applyBlendFactorsForBlendMode:support.blendMode
                            premultipliedAlpha:_vertexData.premultipliedAlpha];

    // Set the required attributes / constants (5)
    int attribPosition = _baseEffect.attribPosition;
    int attribColor = _baseEffect.attribColor;

    glEnableVertexAttribArray(attribPosition);
    glEnableVertexAttribArray(attribColor);

    glBindBuffer(GL_ARRAY_BUFFER, _vertexBufferName);
    glBindBuffer(GL_ELEMENT_ARRAY_BUFFER, _indexBufferName);

    glVertexAttribPointer(attribPosition, 2, GL_FLOAT, GL_FALSE, sizeof(SPVertex),
                          (void *)(offsetof(SPVertex, position)));
    glVertexAttribPointer(attribColor, 4, GL_UNSIGNED_BYTE, GL_TRUE, sizeof(SPVertex),
                          (void *)(offsetof(SPVertex, color)));

    // finally: draw the object! (6)
    int numIndices = _numEdges * 3;
    glDrawElements(GL_TRIANGLES, numIndices, GL_UNSIGNED_SHORT, 0);
}
(1) Since all regular display objects in Sparrow are quads, it contains a performance optimization that batches as many quads as possible together and renders them in a single call. Our polygon is not a quad, of course, so we have to tell Sparrow to finish the latest batch before we take over. Always do this in custom render functions.
(2) Sparrow's statistics display shows the number of draw calls that are executed per frame. To have it include your custom object, tell it that you are going to make such a call.
(3) Now we configure the SPBaseEffect class with the current settings. The mvpMatrix contains the current transformation matrix (in other words, it describes the location of the current object within the stage). When we call prepareToDraw, the suitable shader programs will be activated.
(4) Display Objects support different blend modes. This method takes care of activating the right one.
(5) The shader program may be activated, but we still have to provide it with the correct input data! This is where our vertex buffer comes into play. The buffer contains position and color data for each vertex; the glVertexAttribPointer() calls specify the format of this data.
(6) That's it: now we can draw the object.
Result
Congrats for bearing with me! We have successfully created a custom display object. You can use that class as the scaffold for your own objects.
The complete source code of this class can be found on GitHub. It also contains some small enhancements I skipped in the code above, e.g. it allows you to change the number of edges at run-time.
Find the complete class here: GitHub: Polygon
Where to go from here
This is just the beginning, of course. Here are some things you can do to brush up that class:
- Give each vertex a different color. This will produce pretty cool color gradients.
- Display a texture on the polygon (see here)
- Override the
hitTestmethod to accept hits only within the actual triangles (the code above will accept hits within the complete bounding box). For an example of such an implementation, you can look at a Starling version of this class.
Good luck!
Continue to Finished Part II