Table of Contents
Display Objects
A fundamental part of Sparrow is its display tree architecture. It describes how and where to draw objects on the screen. Sparrow was inspired heavily by the architecture of Adobe Flash: in fact, most classes and functions have the same names as their original Flash equivalent.
The root class of everything that can be displayed on the screen is a subclass of SPDisplayObject. The SPQuad of the last chapter inherits from SPDisplayObject, as do many other classes: Sparrow displays images, textfields, and more.
This is the class hierarchy of display objects:

If we ignore the event dispatcher (we will come back to it later), the topmost class is SPDisplayObject. As I said before, everything that is displayed on the screen will be a subclass of this class. SPDisplayObject is an abstract class; you cannot instantiate it. But it provides methods and properties that all display objects share:
- position (x, y)
- size (width, height)
- scale factor (scaleX, scaleY)
- rotation
- opacity (alpha)
- etc.
If you have a look at the concrete subclasses of SPDisplayObject, you see several classes that can be used out of the box: SPQuad, SPImage, SPTextField, SPButton and SPMovieClip. It should be relatively obvious what can be done with those classes.
And then there is another abstract class called SPDisplayObjectContainer. As its name suggests, it acts as a container for other display objects. It allows display objects to be organized into a logical system — the display tree.
The Display Tree
The world we live in is built up from hierarchies of objects: everything is interconnected. The monitor you look into right now stands on your table, which is placed in your room; the room is part of a house; the house probably stands on planet earth.
Sparrow mimics this hierarchical view of the world. Imagine you want to set up a landscape with mountains, lakes and trees. In Sparrow, you will organize that landscape in a hierarchy of objects. That hierarchy is called “display tree”.
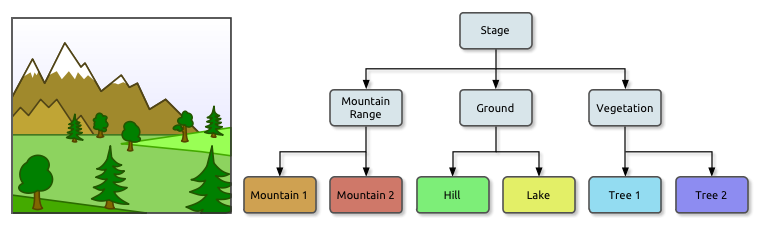
The top of any Sparrow scene is the “stage”. It is created automatically for you. Everything that's connected to the stage will be drawn. To make those connections, you define parent-child relationships between your objects.
This allows you to create complex objects via composition of several basic objects. Imagine an image that has some text painted on it (an SPImage overlaid with an SPTextField). When you move the image, the text should move with it. The same applies for changes in size, scaling, rotation, and opacity. The two objects should simply act as one.
For that, you use an SPDisplayObjectContainer, or an SPSprite (the latter is a subclass of the former and adds a few additional methods; in most cases, you should work with the SPSprite class).
Enough theory: let's look at some sample code. Let's create a sprite and add a text field and an image as its “children”.
// create the sprite, which is our container class
SPSprite *sprite = [SPSprite sprite];

// create some concrete objects: an image and a text field
SPImage *image = [SPImage imageWithContentsOfFile:@"image.png"];
SPTextField *textField = [SPTextField textFieldWithWidth:100 height:20 text:@"Text"];

// now add those objects as children of the sprite
[sprite addChild:image];
[sprite addChild:textField];

// to make the sprite visible, it needs to be added to parent, as well
[self addChild:sprite];
First we added the image to the sprite, then the textfield. The order in which you add the children is important — the children are placed like layers on top of each other.
Now the sprite has two children, and manipulating it will influence how textfield and image are displayed.
// query the number of children
int numChildren = sprite.numChildren; // -> 2

// move everything 50 pixels to the right
sprite.x += 50;

// 'width' and 'height' take into account the sizes and
// positions of the children:
float totalWidth = sprite.width;

// rotate everything by 90 degrees (Sparrow expects radians)
sprite.rotation = SP_D2R(90);
Coordinate Systems
Every display object container has its own coordinate system. Imagine pinning sheets of paper on a pin-board. Each sheet represents a coordinate system with a horizontal x-axis and a vertical y-axis. The position you stuck the pin through is the root of the coordinate system.

Now, when you rotate the sheet of paper, everything that is drawn onto it (e.g. image and text) will rotate with it — as do the x- and y-axes. However, the root of the coordinate system (the pin) stays where it is.
The position of the pin therefore represents the point the x- and y-coordinates of the sheet are pointing at, relative to the parent coordinate system (= the pin-board).
Keep the analogy with the pin-board in mind when you create your display hierarchy. This is a very important concept you need to understand when working with Sparrow.
SPDisplayObjectContainer defines many methods that help you manipulate its children:
- (void)addChild:(SPDisplayObject *)child;
- (void)addChild:(SPDisplayObject *)child atIndex:(int)index;
- (BOOL)containsChild:(SPDisplayObject *)child;
- (SPDisplayObject *)childAtIndex:(int)index;
- (int)childIndex:(SPDisplayObject *)child;
- (void)removeChild:(SPDisplayObject *)child;
- (void)removeChildAtIndex:(int)index;
- (void)swapChild:(SPDisplayObject*)child1
        withChild:(SPDisplayObject*)child2;
- (void)swapChildAtIndex:(int)index1 withChildAtIndex:(int)index2;
Creating custom Display Objects
When you create a game, you split it up into logical parts. A simple game of chess might contain the board, the pieces, a pause button and a message box. All those elements will be displayed on the screen — thus, each will be represented by a class derived from SPDisplayObject.
Take a simple message box as an example.

The message box has a background, an icon, text, and two buttons. Yet you want to have one single MessageBox-class that hides those implementation details.
To achieve this, you create a new class called “MsgBox” that inherits from either SPSprite or SPDisplayObjectContainer:
@interface MsgBox : SPSprite
- (id)initWithText:(NSString *)text;
@end
In its constructor, you create everything that makes up the message box:
- (id)initWithText:(NSString *)text
{
    if ((self = [super init]))
    {
        SPImage *background = [SPImage imageWithContentsOfFile:@"msgbox_bg.png"];
        SPTextField *textField = [SPTextField textFieldWithWidth:100 height:20 text:text];

        SPTexture *buttonTexture = [SPTexture textureWithContentsOfFile:@"button.png"];
        SPButton *yesButton = [SPButton buttonWithUpState:buttonTexture text:@"yes"];
        SPButton *noButton  = [SPButton buttonWithUpState:buttonTexture text:@"no"];

        yesButton.x = 10;
        yesButton.y = 20;

        noButton.x = 60;
        noButton.y = 20;

        [self addChild:background];
        [self addChild:textField];
        [self addChild:yesButton];
        [self addChild:noButton];
    }
    return self;
}
Now you have a simple class displaying a message and two buttons. To use it, just create an instance of MsgBox and add it to the display tree:
MsgBox *myMsgBox = [[MsgBox alloc] initWithText:@"Really exit?"];
[self addChild:myMsgBox];
Now you can add additional methods to the class (like 'fadeIn' and 'fadeOut'); and you will need to find out which button the user clicked! This is done using Sparrow's event mechanism, which is shown in a later chapter.
Next Section: Textures and Images